
| Home | Game | Rules | Theme | Strategy | FAQ |
|
|
Know when to move and when to stayMost of the strategy of Warring States' predecessor Cosmoclasm can be applied to the Chinese struggle as well. The two strategic dimensions of the card management and the board management exist in both games. However, there are some important differences to take into account. The board management
The card managementLet's now move on to the card management. To win a fight on the board, you must first win a fight with the cards. The outcome of this fight determines two things: when do you get to place armies (the timing) and how many do you get to place (the quantity). However, you cannot have both - if you fall back early, you typically get to place early but less armies, and if you fall back late, you typically get to place late but more armies. So far no difference compared to Cosmoclasm - you have to decide what's most important for you at the specific state. The tactical considerations are also similar to Cosmoclasm, with the reservation from above that the differences between peripheral states and central states is less important in Warring States:
What is different is when to play for the different strategies.
In spite of the more flexible gameplay of Warring States compared to Cosmoclasm, it's still a good sign of a well executed strategy if you enter a middle game where your opponents have claimed one state each but where your total value of strongholds is the greatest, giving you an advantage when the final states are fought over. Remember that unlike Cosmoclasm, states are not permanently controlled in Warring States but can change owners several times. However, this strategy also requires a well managed hand of cards and the means for this differ significantly from Cosmoclasm. In Cosmoclasm, the card rules limits you to play one suit at the time. In Warring States on the other hand, you can play any cards as long as the symbols are "linked" (similar to previously played cards). The options this gives you are similar to those of Cosmoclasm but the value of them differs:
I still prefer option 2, since this gives you the possibility to participate each round and contribute to tied states you're currently not interested in. However, it's also risky if other players play the same symbols, since it's more difficult to switch symbols. Option 1 is more flexible and should give you at least 1 battlefield card each round but there is a risk that you fail to link cards and seldom get more than 1 battlefield card. Option 3 is probably weaker compared to Cosmoclasm, since there are more symbols to fight for and you shouldn't waste all your cards on just a few of them.
In the example to the right, player 1 has played a double and a single crossbow card and unless any other player has the same combination, player 1 will be able to fall back with the most crossbows, no matter how many the others have left on their hands. How many cards to spend per round is dependent on the group psychology. If all players are aggressive, you can afford to be that as well, and if all players save their cards, you should as well. The important thing is to maintain the balance in states, armies and cards so that not a single player benefits from the other players' depleted card hands (unless, of course, you're the benefitted player). How about the spy cards then? They do not allow any armies but rather let the player determine the next state and starting player. This is not very important in the game opening but as your armiess spread across the Empire, you will find states where you have more adjacent strongholds than other players and hence an advantage in upcoming superiority fights. Spies may let you advance the resolution of those states before the other players catch up. You may also choose to delay the resolution of those states, if your card hand is too weak to take advantage of your armies and you want to save them for later. Depending on your hand, you may also want to go first and fall back first (if you focus on few strong symbols) or last (if you focus on many weaker symbols). A majority of spy cards also gives you an extra card. Not only does this compensate you for the spent card but it also gives you more options for the cards you intend to play the next round. Perhaps you have a strong hand in one symbol that you know another player is also strong in? Save them for later and take three cards with another symbol instead. Spy cards can be particularly powerful in the end game. At this stage, you have typically decided which state that is necessary to win and started to build up a strong hand to get it. A spy majority will not only let you advance the resolution of this state but also let you get the extra cards necessary to make your hand invincible. But each spy symbol on your hand also means one less of another symbol, doesn't it? Yes, it does, so when taking a spy symbol, make sure you do it on the expense of a symbol that you don't need anyway. Say that you collect crossbows one turn and are given the opportunity to take a cavalry card. If you don't have any other cavalries, you're much better off taking a spy-crossbow card instead. ConclusionTo conclude our discussion, you must formulate a strategy in terms of both board management and card management to be able to play both tactically (place armies) and strategically (manipulate armies) where they make the most difference, either by maintaining a balance between the other players or by giving you the edge. |
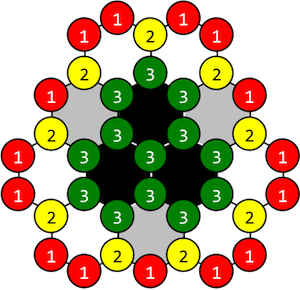 The numerical facts of Warring States are exactly the same as in Cosmoclasm:
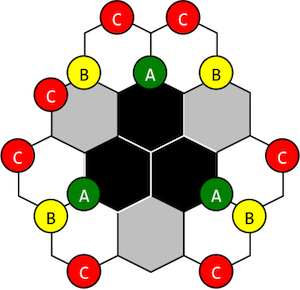 If the placed armies had been permanent as in Cosmoclasm, an army placed in a double stronghold (B) had been
twice as strong as an army placed in a single stronghold (C) and an army placed in a triple stronghold (A)
had been three times as strong. However, the presence of strategies obscures this view.
If the placed armies had been permanent as in Cosmoclasm, an army placed in a double stronghold (B) had been
twice as strong as an army placed in a single stronghold (C) and an army placed in a triple stronghold (A)
had been three times as strong. However, the presence of strategies obscures this view.
 As in Cosmoclasm, a balanced hand should also aim for a balance between double symbol cards and single
symbol cards (advisors).
It may seem that a player with only double cards will spend less cards to win battlefield cards but by
adding single cards, you may be able to beat their double cards and fall back before they have the time
to respond.
As in Cosmoclasm, a balanced hand should also aim for a balance between double symbol cards and single
symbol cards (advisors).
It may seem that a player with only double cards will spend less cards to win battlefield cards but by
adding single cards, you may be able to beat their double cards and fall back before they have the time
to respond.